Taking... Too... Long... To... Post!
Alrighty, back on track now. the Musha is completed of course, so are the two models I chose for April. I plan on getting everything posted for the Musha within a couple days here. I didn't want to do too much with the Musha's internals because I had never intended to leave the armors off, at least not with this version of the model. The Sengoku no Jin version has a gloss finish to the exterior and gold plating, why would I want to focus on anything else on the body of the kit?! So I just took care of the details that will be seen from the outside.


Look at the almost mirror like finish on those parts! I wish I had a paint I could hand brush like that! I don't have an airbrush, nor the means of using one in my current living quarters... one day I'll have something, though.
The first part of the model I tackled was the head. A lot of little details go into the head of a Master Grade kit! Clear eyes and cameras, chin pieces, and for the Musha, Samurai Helmet accessories.

These are the parts for the head that require a bit of work. most of the stickers are for the head alone. I never use the foil stickers. If I could paint tiny text, I wouldn't use the clear ones either (I know Bandai has decals for purchase now, though). But I find the foil decals look cheap and can cheapen the model's over all look. They also tend to come off over time.
So...

First I painted the camera lenses. The stickers for them are orange, I double checked the manual, and yes, that is the color used. A base color of gloss yellow is applied.

For the clear part, I painted the BACK of the peace only where it shows through to the front of the camera. I figured this trick out a long while back when I built my first Master Grade kit with eyes. I think it was inspired by a review of the HGUC GM review in which the reviewer painted the head silver behind the green lens. That review may have been on Crazy Probe's blog which is long gone, I think.
 Next I painted just the eye portion with a clear acrylic green. I later went back and thinned it out a touch.
 But here's the affect you get with the clear paints, the eye's still have a decent amount of translucency.
 Last the main front and rear cameras get a clear acrylic red. The red is painted right over the yellow on the rear camera and on the front of the clear piece for the front camera. The edge around the eyes is painted flat black, but only on the front of the piece so light can shine on through.
The top of the face has a portion that is to have a decorative border of gold with some of the glossy almost metalic red of the main body.
 I used gold for the border, the Testor's gold paint is a little browner than I'd like, I've tried mixing it with silver and it dulls it, I've tried mixing it with yellow and it muddies it... so I didn't know what else to do but just use it as is. On the top of the head for the red part, I simply mixed Testor's metallic red and flat red, and it maches the plastic color perfectly! Luckily there was enough of a border molded into the head to follow where the stickers were to be placed. There wasn't a border for the gold border on the forehead though, I had to free hand it.

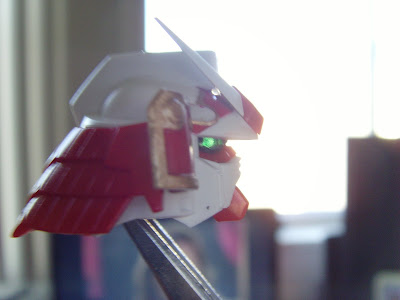
And the head is completed! With glowing green eyes to boot! I hope to get another couple of posts done up tomorrow.

No comments:
Post a Comment